If you’ve recently stepped into photography, you’ve probably heard the term “exposure triangle” thrown around—and maybe it sounded a bit technical or intimidating. The good news? It’s actually quite simple once you break it down. Understanding this concept is one of the biggest steps you can take toward moving from “auto mode” to full creative control.
Let’s walk through it together.
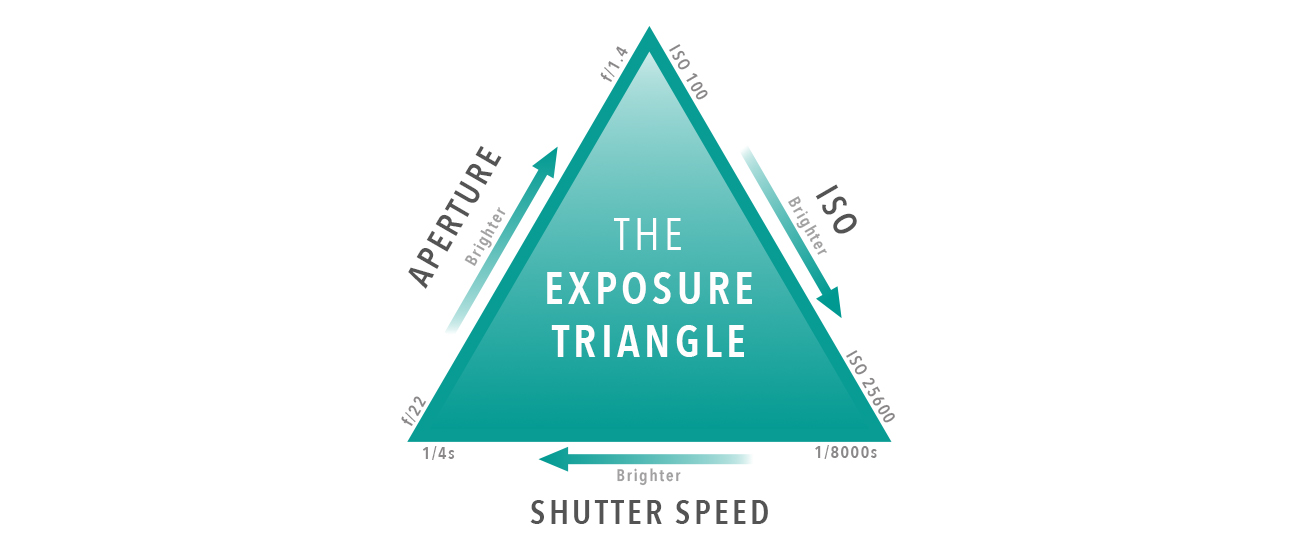
What Is the Exposure Triangle?
The exposure triangle is made up of three settings that control how bright or dark your image is:
- Aperture
- Shutter Speed
- ISO
These three elements work together to create a properly exposed photo. Change one, and you’ll usually need to adjust at least one of the others to keep your image balanced.
Think of it like a triangle of light control—each side influences the others.
1. Aperture (f-stop): Controlling Depth and Light
Aperture refers to the opening in your lens that lets light into the camera. It’s measured in f-stops (like f/1.8, f/4, f/11).
How it works:
- Lower f-number (e.g., f/1.8):
- Wide opening
- More light enters
- Blurry background (great for portraits)
- Higher f-number (e.g., f/11):
- Narrow opening
- Less light enters
- More of the scene in focus (great for landscapes)
Beginner tip:
If you want that nice blurry background, start with a low f-number like f/2.8.
2. Shutter Speed: Freezing or Blurring Motion
Shutter speed determines how long your camera’s sensor is exposed to light. It’s measured in seconds or fractions of a second (like 1/1000 or 1/30).
How it works:
- Fast shutter speed (e.g., 1/1000):
- Lets in less light
- Freezes motion (sports, wildlife)
- Slow shutter speed (e.g., 1/10):
- Lets in more light
- Creates motion blur (waterfalls, light trails)
Beginner tip:
If your photos are blurry from hand movement, try using a faster shutter speed like 1/125 or higher.
3. ISO: Sensitivity to Light
ISO controls how sensitive your camera sensor is to light.
How it works:
- Low ISO (e.g., 100):
- Less sensitive to light
- Cleaner image (less noise/grain)
- High ISO (e.g., 1600 or more):
- More sensitive to light
- Brighter image, but more grain/noise
Beginner tip:
Keep ISO as low as possible for the best image quality—only increase it when you need more light.
How They Work Together
Here’s where it all clicks:
- Open your aperture (more light)?→ You may need a faster shutter speed or lower ISO.
- Use a faster shutter speed (less light)?→ You may need a wider aperture or higher ISO.
- Increase ISO (brighter image)?→ You might compensate with a faster shutter or smaller aperture.
It’s all about balance.
Final Thoughts
The exposure triangle isn’t just about getting the “right” brightness—it’s about creative control. Each setting doesn’t just affect light; it changes the feel of your image.
At first, it might feel like juggling three things at once. But with practice, it becomes second nature—and that’s when photography really starts to get fun.
So grab your camera, switch off auto mode, and start experimenting. That’s the fastest way to learn.
You don’t need perfect settings—you just need curiosity and practice.