If you’ve ever picked up a camera and switched to manual mode, you’ve probably come across the term ISO. Alongside aperture and shutter speed, ISO is one of the three pillars of exposure—often referred to as the “exposure triangle.” But what exactly does it do, and how can you use it to improve your photos?
Let’s break it down in a clear, practical way.
What Is ISO?
ISO measures your camera sensor’s sensitivity to light.
- Low ISO (e.g., 100 or 200) → Less sensitive to light
- High ISO (e.g., 1600, 3200, or higher) → More sensitive to light
In simple terms, increasing ISO brightens your image, while decreasing it makes your image darker.
Why ISO Matters
ISO gives you flexibility when shooting in different lighting conditions. Imagine you’re in a dimly lit room without a tripod—raising your ISO allows you to capture a brighter image without needing a slower shutter speed that could cause blur.
However, there’s a trade-off.
The Downside: Noise (Grain)
As ISO increases, so does digital noise—that grainy texture you sometimes see in photos taken in low light.
- Low ISO → Clean, sharp images
- High ISO → Brighter images, but with more grain
Modern cameras handle noise much better than older ones, but it’s still something to be mindful of.
When to Use Low ISO
Use a low ISO setting when:
- You’re shooting outdoors in bright daylight
- You have plenty of natural or studio lighting
- You want the highest image quality possible
Example: Landscape photography on a sunny day typically uses ISO 100 for crisp detail and minimal noise.
When to Use High ISO
Use a higher ISO when:
- You’re shooting in low light (indoors, night scenes)
- You need a fast shutter speed (e.g., sports or wildlife)
- You don’t have a tripod or additional lighting
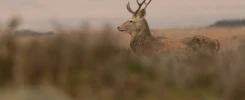
Example: Concert photography often requires ISO 1600 or higher to capture movement without blur.
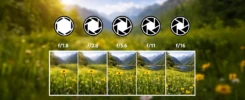
Finding the Right Balance
ISO doesn’t work alone—it’s part of a system. Adjusting it affects how you set:
- Aperture (depth of field)
- Shutter speed (motion blur)
The key is balance. For example:
- If your image is too dark, you can:
- Increase ISO
- Slow your shutter speed
- Open your aperture
Each choice has a different creative effect.
A Practical Tip for Beginners
Start with this approach:
- Set ISO as low as possible for your lighting conditions
- Adjust aperture and shutter speed for your creative goal
- Only increase ISO when you can’t get enough light otherwise
This helps you maintain image quality while still getting the shot.
Final Thoughts
ISO is one of the easiest settings to understand, yet one of the most powerful. Mastering it allows you to shoot confidently in almost any lighting condition.
The next time you pick up your camera, don’t leave ISO on auto—experiment with it. Take the same shot at different ISO levels and compare the results. You’ll quickly see how it affects brightness and image quality.
Photography is all about control, and ISO is a big part of that control. Learn it well, and your photos will thank you.